
🧰 Setting Up the Servos!
Connecting the Servos!
Now that we have assembled the arm, we can move on to setting up the servos. This step will help you get the servos calibrated and attach the arm to the base. For this step you will need:
- 3x Servos
To complete this step, follow the instructions in the video below.
Note: Make sure that the servos are connected to the right places and are in the correct orientation.
Uploading the Code!
After you have connected the servos, we can move on to uploading the code to the Arduino. To do this, you will need to open the Arduino IDE on your computer.
First, navigate to where you or your teacher saved the Rollarm folder. You are looking for the following folder path: DIY Control Robot Arm kit for Arduino-Rollarm/Arduino/Code/Servo.
When you open this folder you should see a file called Servo.ino. This is the file we want to open.
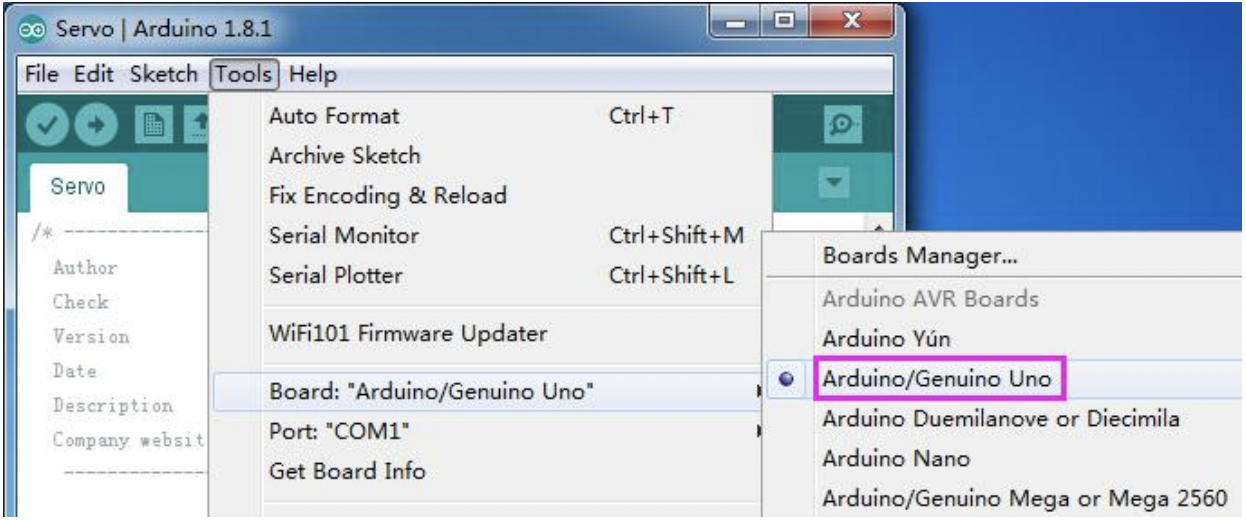
Now we need to make sure we are connected to the correct board and port. Click on Tools in the toolbar and make sure your board is listed as Arduino/Genuino Uno and that you are connected to the correct port like in the picture below.
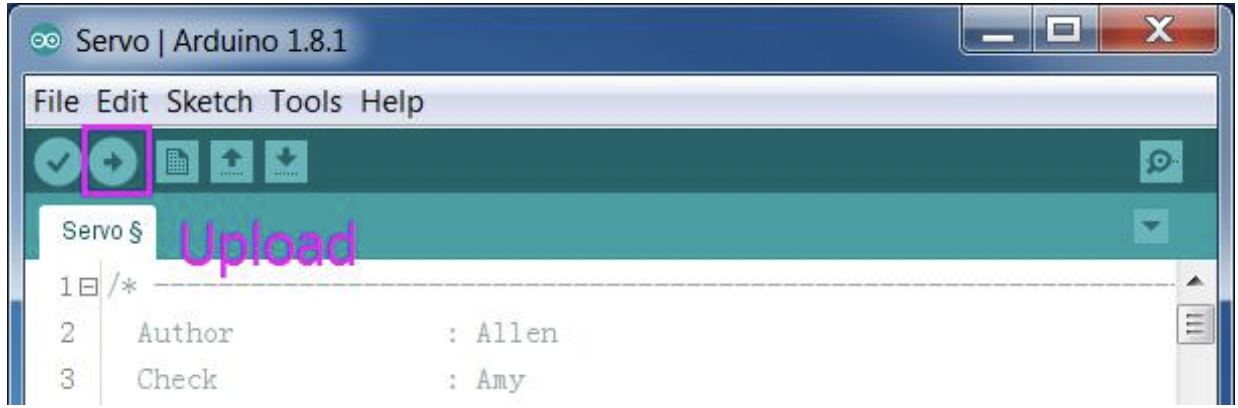
Once you have double-checked both of these settings you simply need to press the upload button to upload the servo code to the Arduino like in the picture below.
At this point, you may hear a slight whirring noise from the servo. This is the sound of the servo setting itself to the 90-degree position. If you don't hear the sound, the servo is already in the correct position. You can now gently try to turn the servo by hand and you should notice that it is locked in place!
Note: At this point, the robot arm needs to stay plugged into the computer until we are finished assembling the full arm.
Attaching the Arm to the Base!
Now that the servos have been calibrated, we can attach the arm to the base. To do this you will need the following parts:
- Your Base
- Plate 8
- Your Arm
- Matching Servo Screw
Look back at the previous video if you need help with the steps.
Note: Make sure not to twist the servo when attaching the arm.