
📣 Audio Classifier
Speech Recognition
This Audio Classifier is used for classifying sounds and speech data. This type of machine learning can be applied to many practical scenarios, like classifying music clips to identify music genre or having devices that understand your voice commands.
If you have already completed the Hand Pose Classifier, then this should be easy for you because you have already received an introduction to using Pictoblox. The tutorial steps are below or you can watch the video.
Steps:
Setting up the Environment
- We begin by making the machine learning model in Pictoblox. When you open the software, select the “Machine Learning Environment” option.
- Click on “Create a New Project.”
- Type in a project name of your choice and select the “Audio Classifier” extension. You can be as specific as you want for a project name, but it is usually a good idea to include the date and the general idea you are working on. For example, if I want to teach the machine to distinguish between different bird species, then I might put “12/10/2022 bird calls.”
- Click the “Create Project” button at the bottom right corner to open the window.
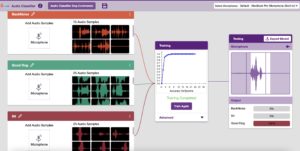
- Inside this workflow, there are two classes already made for you. Change the class’ names before you start making it, or you won’t be able to change it later.
Collecting and Uploading the Data
- You should see two classes to begin, with the first being “BackNoise.” This class includes all sounds related to background noise and that will have no meaning. Try this yourself with the background noise of A/C, fan, TV, moving around, light music, and anything else you can think of.
- Then, name your next class. Remember similar audio is put in one class. If you were doing farm animals, a class might be “owl” or “mallard.”
- Now, you can add samples by using your device’s microphone. Click on the “Microphone” button to record samples. Samples are recorded in a 1-second burst. This might take some trial and error, so make sure you delete samples that don’t have the right sound.
- Add at least 20 samples to each class.
Training the Model
- By training the model, the computer extracts meaningful information and patterns from the new, unheard sounds.
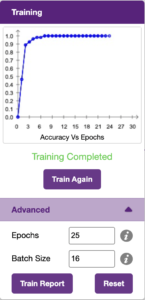
- When you click the “Advanced” tab, you will see three hyper parameters.
- Epochs– The total number of times your data will be fed through the training model. Therefore, in 25 epochs, the dataset will be fed through the training model 25 times. Increasing the number of epochs can often lead to better performance.
- Batch Size– The size of the set of samples that will be used in one step. For example, if you have 160 data samples in your dataset, and you have a batch size of 16, each epoch will be completed in 160/16=10 steps. You’ll rarely need to alter this hyperparameter.
- Learning Rate– It dictates the speed at which your model updates the weights after iterating through a step. Even small changes in this parameter can have a huge impact on the model performance. The usual range lies between 0.001 and 0.0001.
3. Click on the “Train Model” button to start training. The higher the reading in the accuracy graph, the better the model. If the model accuracy is bad or below “moderate,” then try increasing the epochs or adding more samples. The range of the accuracy is 0 to 1.
Testing the Model
Now that the model is trained, let us see if it delivers the expected results. We can test the model using the microphone again. The model will start predicting based on the new audio you produce.
This achievement is music to our ears!
Reflections
Can you think of some examples of applications of audio classification using machine learning?
What are some challenges that we might encounter when building a machine learning model for audio classification?
How do we go from machine learning for audio classification to actually executing commands? If you want to try this yourself using python code, go to the Next Section!